

A well-designed water system makes life on the road cleaner, easier and more comfortable.
Whether you’re planning a simple setup with jerry cans or a full hot-water system with pumps and tanks, this guide explains everything you need to know.
👉 Browse our full water system range:
https://highpeakconversions.co.uk/category/water-equipment/campervan-water-management/
There are three common levels of water setup in van conversions:
Perfect for beginners, day vans, micro campers, or simple weekend setups.
Includes:
Fresh water container
Waste water container
Manual hand pump or foot pump
Small sink
Pros:
✔ Cheapest option
✔ No wiring required
✔ Easy to install and maintain
Cons:
✘ No pressurised water
✘ Not ideal for showers
This is the setup used in 80% of campervans.
Includes:
Fresh water container or tank
Submersible or inline 12V pump
Tap with micro-switch or pressure switch
Waste water container
Basic plumbing (food-grade hose, clips, adapters)
Pros:
✔ Running water from your tap
✔ Silent pumps available
✔ Very easy to wire and plumb
✔ Works great for kitchens
Cons:
✘ Limited pressure
✘ Pump needs replacing every few years
Ideal for full-time campers or anyone wanting a shower.
Includes:
Fixed fresh & waste tanks
High-quality pressure pump
Accumulator tank (optional but recommended)
Calorifier or electric water heater
Shower mixer & pipework
Pros:
✔ Proper water pressure
✔ Supports hot water
✔ Great for showering & washing up
Cons:
✘ More space required
✘ Requires careful planning
✘ Higher cost
You have three main choices depending on van size and layout:
Best for small vans and simple builds.
Pros:
Removable for easy filling
Cheap
No permanent installation
Typical size: 10–20L per container.
Mounted inside or under the van.
Pros:
Much larger capacity
Cleaner look
Ideal for long trips
Works well with hot water systems
Consider if you need:
A shower
Long stays off-grid
More than 20L/day usage
Great for saving interior space (commonly for waste).
Notes:
Must be insulated in cold climates
Requires secure brackets
Good option for grey water
👉 Explore tanks, pumps & fittings:
https://highpeakconversions.co.uk/category/water-equipment/campervan-water-management/
You’ll choose between two main types of 12V pump:
Simple, quiet, cheap and reliable.
Best for:
Small to medium campervans
Tap with micro-switch
Pressure: Low (~0.6–1.2 bar)
Provide higher pressure and flow.
Best for:
Shower systems
Hot water setups
Taps without micro-switches
Pressure: Medium–High (1.4–3 bar)
Tip: Add an accumulator tank to reduce pump cycling and noise.
Your tap determines whether the pump runs:
Switch built inside the tap.
Pump runs only when the lever is lifted.
Works with:
✔ Submersible pumps
Pump activates when the tap opens and pressure drops.
Works with:
✔ Inline/diaphragm pumps
✔ Modern flexible setups
There are 3 main options:
Most common for day vans and simple builds.
Cleaner and more professional, ideal for bigger builds.
Used on campsites to store larger waste volumes.
10–20L fresh tank
Submersible pump
Micro-switch tap
10–20L waste tank
Food-grade 12mm hose
12V feed & 5A fuse
Perfect for basic cooking, handwashing, brushing teeth.
50–70L fresh tank
30–50L underslung waste
Inline pump + accumulator
Hot water heater (gas/electric)
Mixer shower tap
Ventilation over shower
Great for off-grid camping.
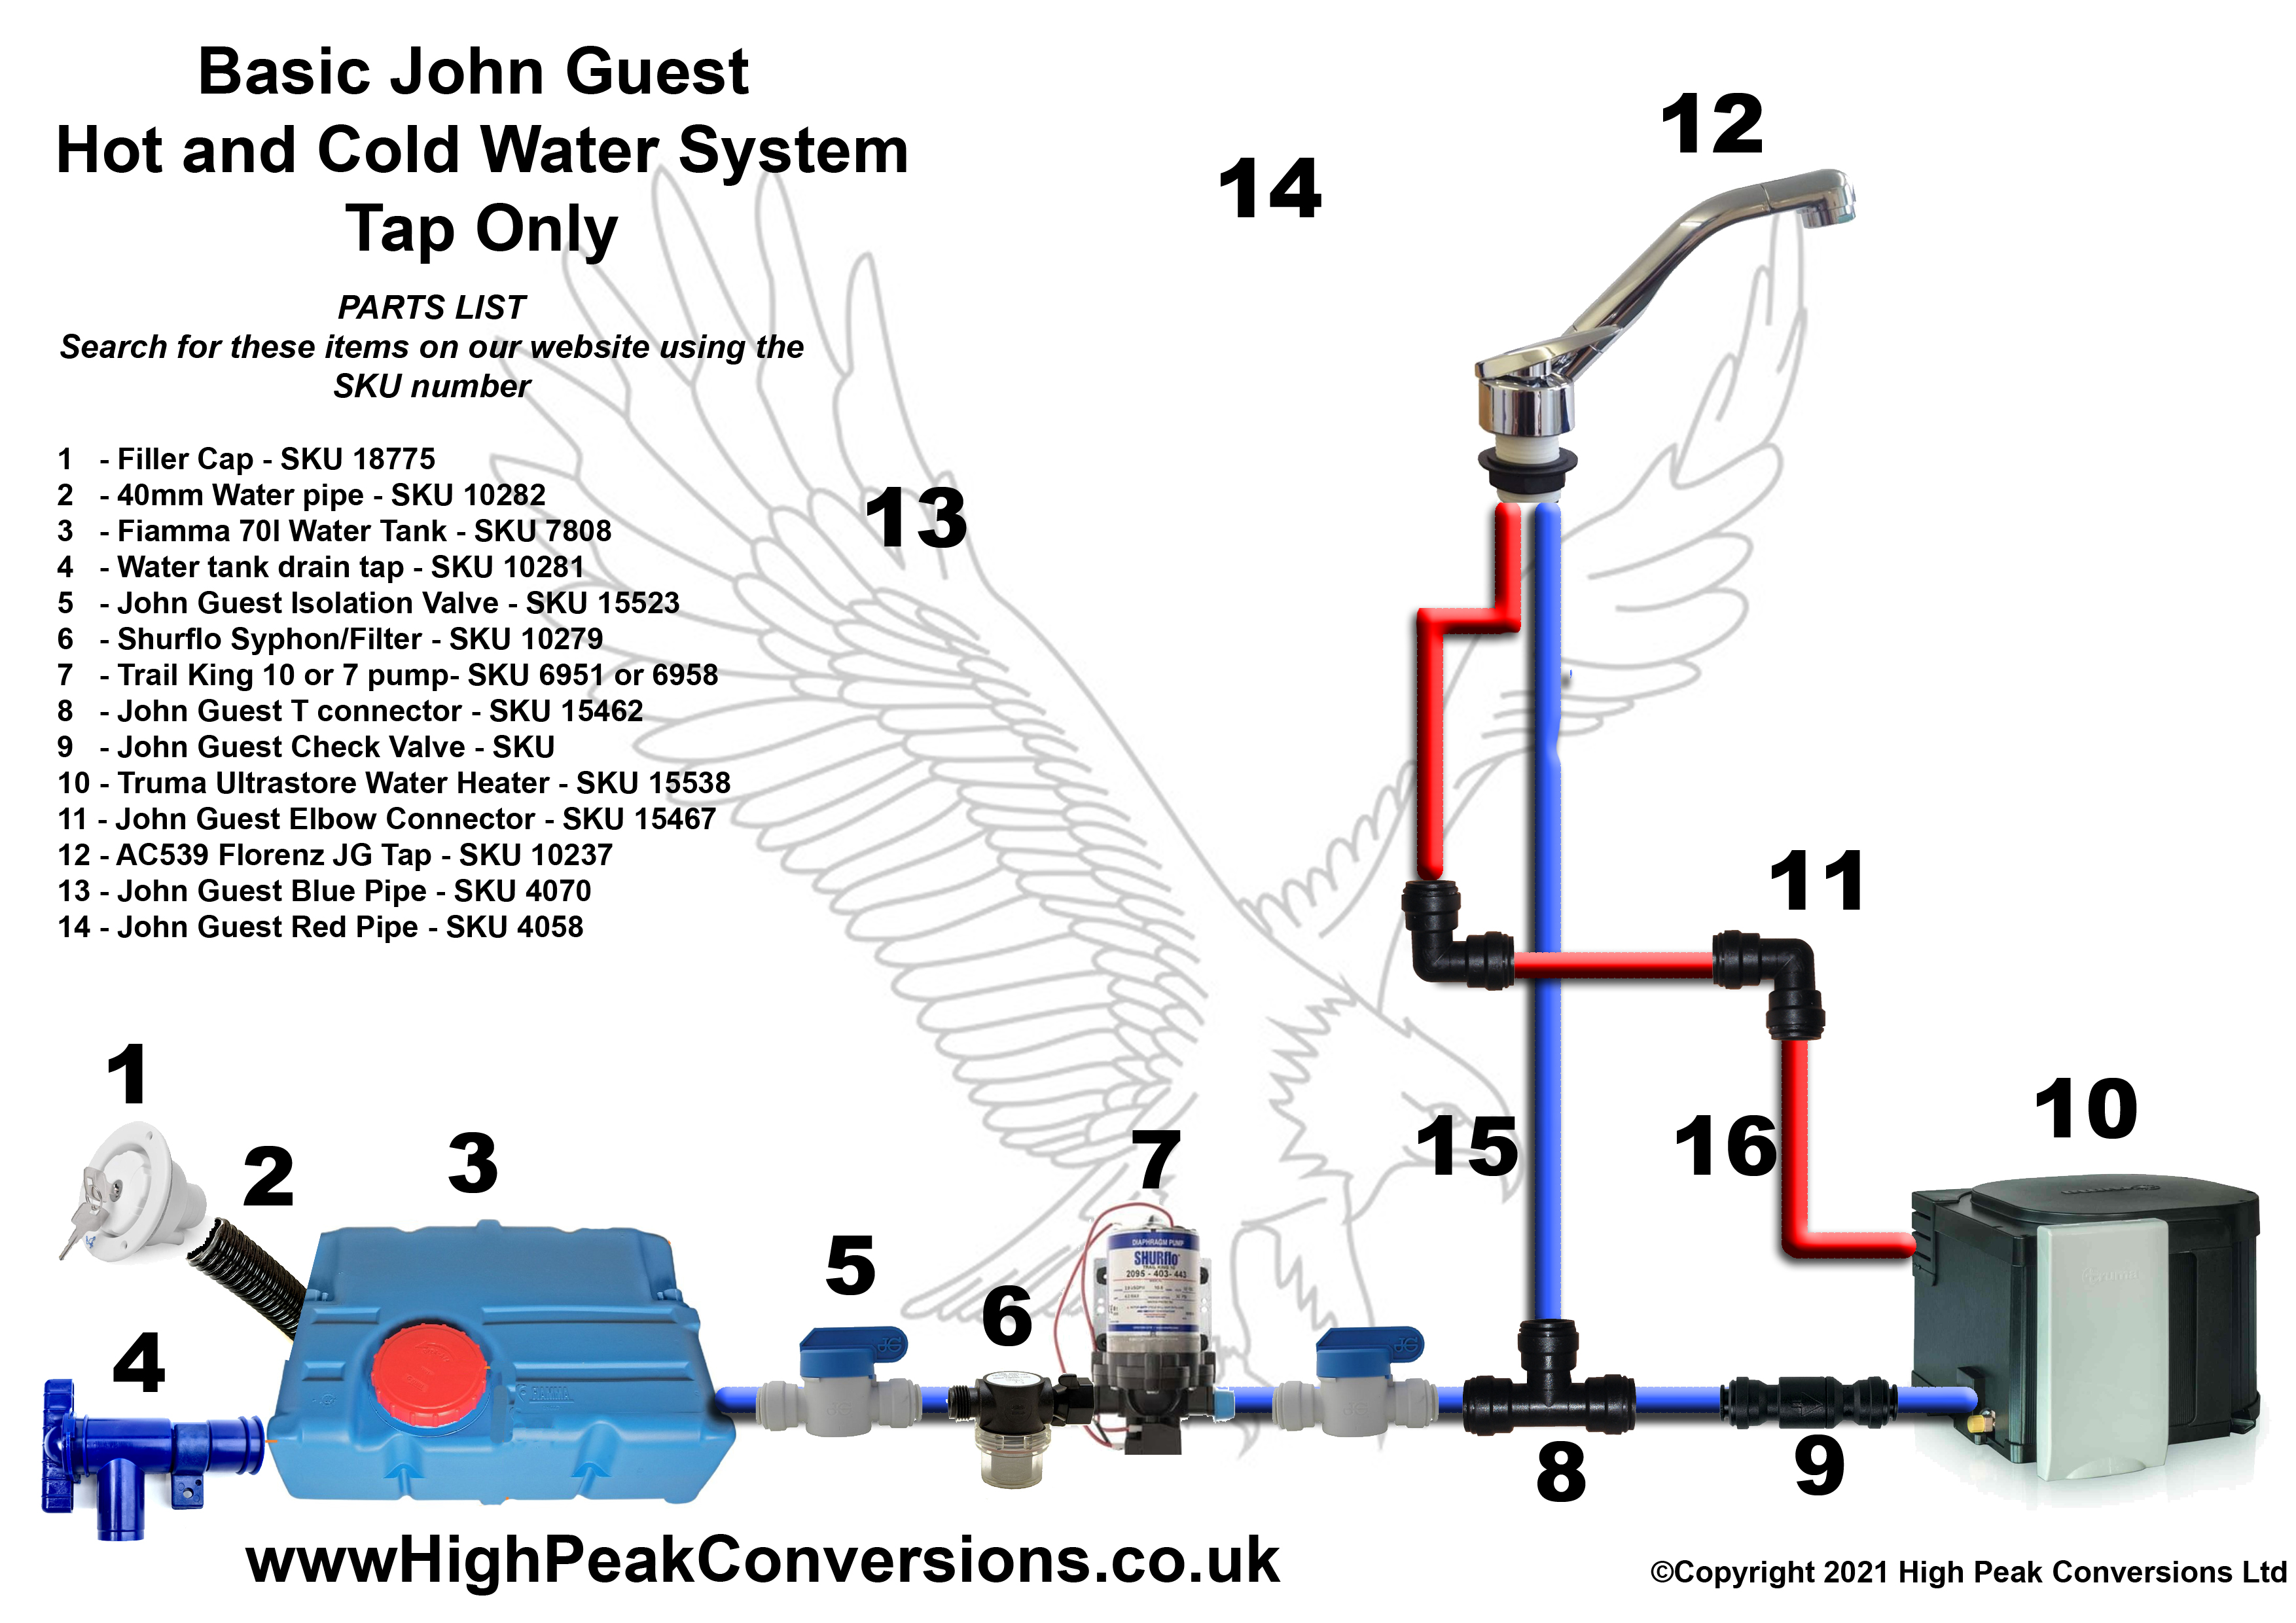
Simple John Guest plumbing layout for a basic sink installation.
Most 12V pumps draw:
Submersible pumps: 1–3A → 5A fuse, 1 mm² cable
Inline diaphragm pumps: 4–7A → 10A fuse, 1.5 mm² – 2 mm² cable
Keep cable runs short and use waterproof connectors inside the tank area.
✔ Use only food-grade hose
✔ Avoid garden hose — it tastes awful
✔ Add a non-return valve to prevent backflow
✔ Secure every hose with stainless clips
✔ Protect pumps from dry running
✔ Use PTFE tape on threaded fittings
✔ Don’t overtighten plastic connectors
We supply:
Fresh & waste water tanks
Submersible & inline pumps
Taps & micro-switch taps
Food-grade hose & fittings
Showers & accessories
Water inlets & connectors
👉 Browse water system components:
https://highpeakconversions.co.uk/category/water-equipment/campervan-water-management/
A well-designed water system makes your camper feel like home.
Start simple if you’re a beginner, or build a fully pressurised system if you want hot water and showers.
Recommended setup for most vans:
➡️ 10–20L fresh tank
➡️ Submersible pump
➡️ Micro-switch tap
➡️ Waste tank under sink
Easy to build, reliable and cost-effective.